
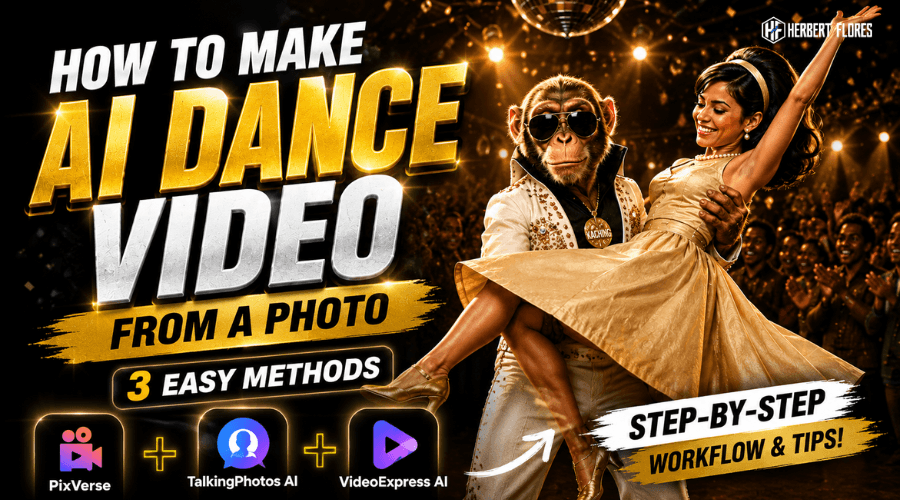
Have you seen those viral videos where a normal photo suddenly starts dancing like a real person?
The good news is that you don’t need motion-capture equipment, animation skills, or expensive video production software to create one.
I recently created an AI dance video featuring my AI character, Kuya Kaching, starting with still images and turning them into a complete dance sequence with different movements, a dance partner, music, and a call-to-action.
Here’s the finished result:
@kuyakachingai 🕺✨ 𝑾𝑨𝑰𝑻… MARUNONG KA BANG SUMAYAW? 👀🔥 Akala mo hanggang AI tips lang si Kuya Kaching? 😂 May dance moves din si Kuya! 🕺💃 Watch hanggang dulo — may surprise dance partner pa! 😎✨ 👇 Gusto mo rin gumawa ng ganitong AI dance? Comment “DANCE” at sabihin ko kung paano! 🔥 #AIDance #KuyaKachingAI #AITutorials ♬ original sound – kuyakachingai
In this tutorial, I’ll show you three ways to make an AI dance video from a photo, including a quick template method and the more advanced workflow I used to create the Kuya Kaching video above.
You can use the same process for yourself, an AI influencer, a fictional character, a product mascot, or even two characters dancing together.
What You Need to Make an AI Dance Video
You don’t need much to get started.
You’ll need:
- A clear photo or AI-generated character
- An AI image-to-video generator
- A dance template or animation prompt
- Optional video-editing software to combine your clips
- Music or sound effects for the final video
For TikTok, YouTube Shorts, and Facebook Reels, I recommend creating everything in a 9:16 vertical aspect ratio from the beginning.
This avoids unnecessary cropping later.
Step 1: Create Your Character or Starting Photo
You can start with an existing photo of yourself or create an entirely new character using AI.
For dancing videos, a full-body image generally gives the AI more visual information about the arms, legs, clothing, and body position.
Try to avoid images where:
- Arms or legs are heavily obstructed
- Feet are outside the frame
- Multiple people overlap
- The character is standing in an unnatural position
If you’re building a recurring AI character, consistency becomes even more important.
I recommend creating a high-quality master reference image and keeping the important visual characteristics consistent across your scenes.
For Kuya Kaching, for example, I want his facial appearance, sunglasses, clothing style, accessories, and overall proportions to remain recognizable from one shot to another.
Method 1: Make an AI Dance Video With PixVerse
If you’re a beginner and just want to make a photo dance quickly, one of the easiest approaches is using ready-made templates.
You can start with PixVerse.
Instead of describing an entire dance sequence through a complicated prompt, you can choose from available video templates and let AI apply the movement to your image.
How to Use PixVerse for AI Dancing
The basic workflow is simple:
1. Create your character image.
Use a clear image where the person or character is easy to identify.
2. Open PixVerse and look for Templates.
Browse the available templates and find the dance-related options on Dance Party.
3. Select the dance you want.
Preview different movements until you find something appropriate for your image.
4. Upload your image.
Use your full-body character image whenever possible.
5. Generate the video.
Let PixVerse animate the photo using the selected template.
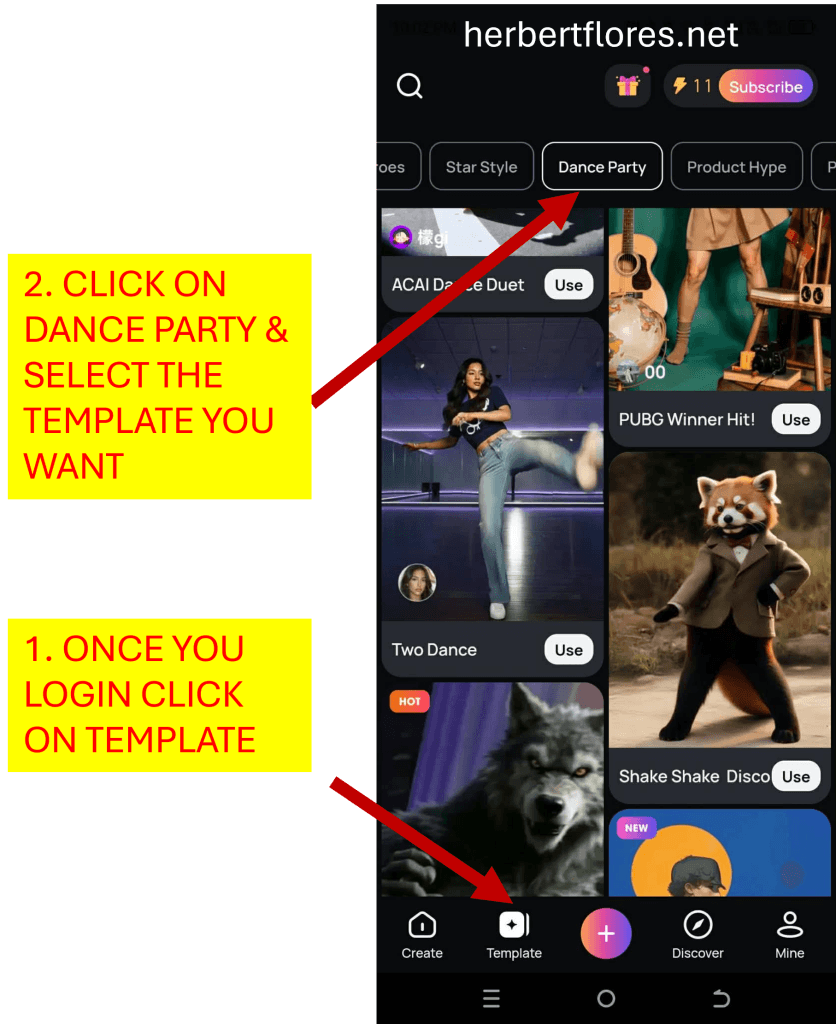
PixVerse makes it easy to turn a still image into a short AI dance video using ready-made templates.
Why Use PixVerse?
The biggest advantage is speed.
You don’t need to understand advanced prompting or manually describe every dance movement.
Your workflow can literally be:
Photo → Dance Template → Generate → Edit → Post
This makes it particularly useful for experimenting with TikTok trends, Reels, Shorts, memes, and quick social-media content.
However, templates also mean you have less control over the exact choreography.
That’s where the next methods become useful.
Method 2: Create AI Dancing Characters With TalkingPhotos AI
Another option is TalkingPhotos AI.
TalkingPhotos AI is especially interesting if you’re already creating AI characters, virtual presenters, or talking-photo content.
Instead of treating dancing as your entire video, you can incorporate character actions into a larger piece of content.
For example:
Talking → Walking → Dancing → Talking → CTA
That creates something closer to a short AI-generated story rather than a single animated photo.
Basic TalkingPhotos AI Workflow
Start by uploading or creating your character.
Then select the available action or dance feature, choose the movement you want, generate the animation, and download the finished scene for editing.
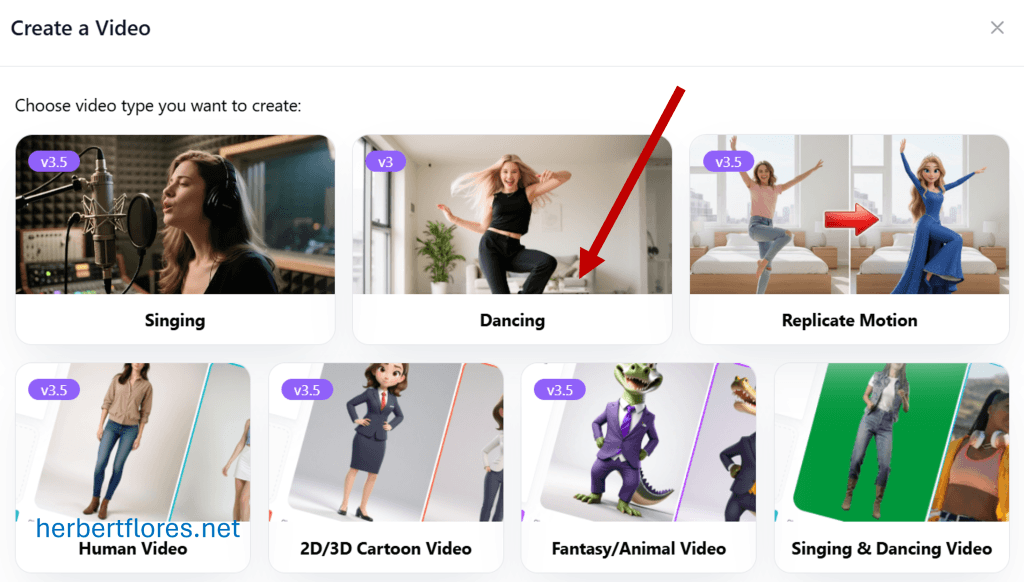
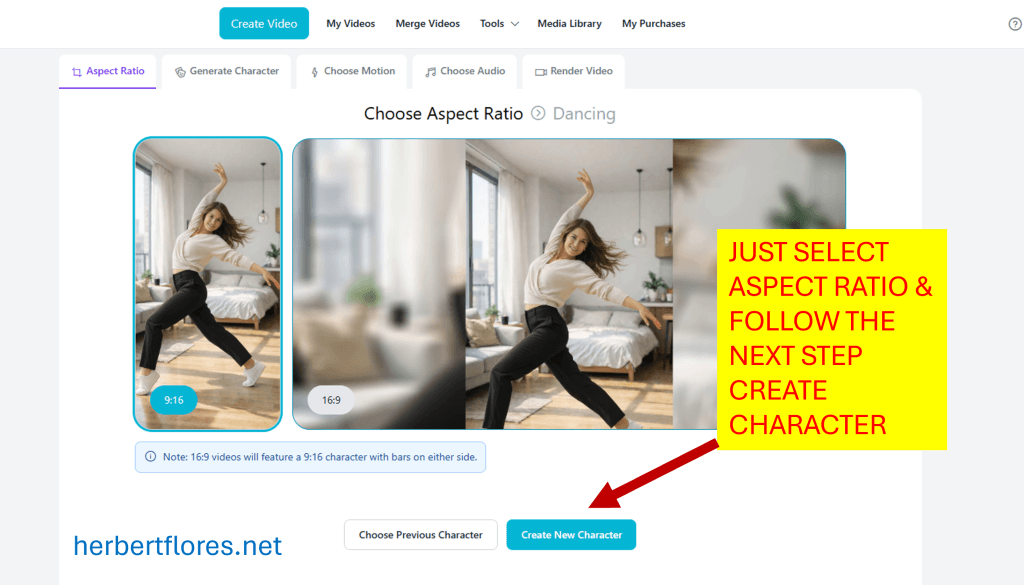
TalkingPhotos AI can be useful when you want character actions to be part of a larger AI spokesperson or character video.
When I Would Use TalkingPhotos AI
I’d consider this method when I’m primarily working with realistic human characters and want the dancing scene to be part of a larger character-based video.
For more unusual characters and highly customized sequences, however, I prefer having more control over each scene.
That’s where my third method comes in.
Method 3: My Recommended Workflow Using VideoExpress AI
For the Kuya Kaching dance video shown at the beginning of this tutorial, my preferred tool was VideoExpress AI.
This is a different workflow from simply choosing a dance template.
Instead of asking AI to make one long video and hoping everything comes out correctly, I build the video as a sequence of short controlled scenes.
This gives me much more creative control.
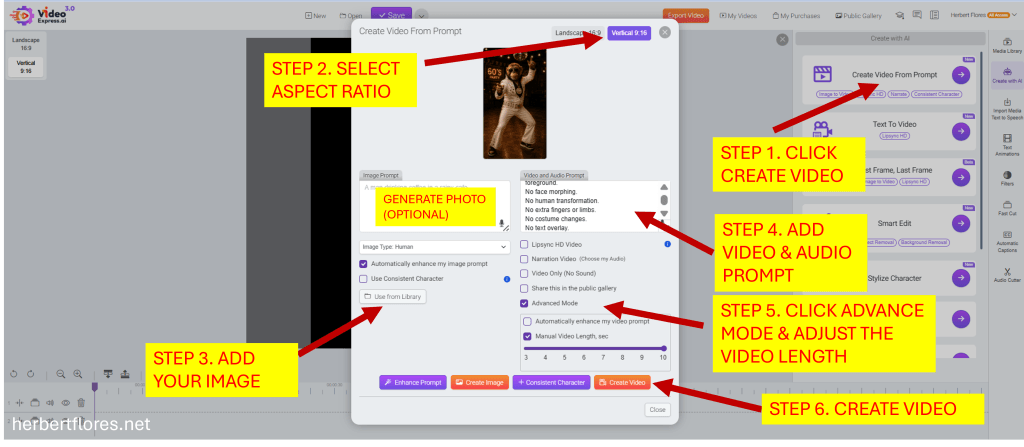
I used an image-to-video workflow in VideoExpress AI to build the Kuya Kaching dance video scene by scene.
My Exact AI Dance Video Workflow
Here’s the strategy I used.
Step 1: Create the Main Character Image
First, create a strong reference image.
For this project, I created Kuya Kaching wearing a white, jeweled retro stage outfit inside a 1960s-inspired party environment.
The important thing isn’t the exact costume.
It’s establishing the character, location, lighting, and visual style before animation begins.
Step 2: Start With a Hook
Don’t immediately start dancing.
Give viewers a reason to stop scrolling.
For the Kuya Kaching video, I used a short opening:
“Oh! Marunong ka bang sumayaw? Hindi? Tara—sayaw tayo!”
Then the music and dancing begin.
That gives the video a simple structure:
HOOK → ANTICIPATION → DANCE
This is much stronger than simply uploading an AI character randomly dancing.
Step 3: Animate the First Dance Scene
Next, upload your image to VideoExpress AI and use the image-to-video workflow.
One lesson I’ve learned from creating AI videos is that longer prompts aren’t automatically better.
Tell the generator exactly what matters.
A useful structure is:
CHARACTER + ACTION + CAMERA + ENVIRONMENT + RESTRICTIONS
Here’s an example:
A realistic monkey character performs an energetic retro dance on the dance floor while maintaining exactly the same facial appearance, outfit, sunglasses, jewelry, and body proportions. Natural full-body dancing with realistic footwork and arm movements. The camera follows the performance with subtle cinematic movement. Maintain consistent character identity throughout the shot. No dialogue, no face morphing, no costume changes, no extra limbs.
Notice that we’re not only telling AI what to do.
We’re also telling it what NOT to change.
Step 4: Don’t Force AI to Create Everything in One Generation
This is probably one of the most important tips in this tutorial.
AI video generators can struggle when you ask for too many actions at once.
For example:
Dance, walk across the room, find another character, grab her hand, perform another dance, spin around, talk to the camera and finish with a CTA.
That’s a lot of visual information for one short generation.
Instead, break it down.
For my video, I created separate scenes.
Scene 1: Kuya Kaching introduces the dance.
Scene 2: Solo dancing.
Scene 3: His dance partner joins him.
Scene 4: They perform another dance position.
Scene 5: They perform a bigger finishing movement.
Scene 6: Outro and call-to-action.
Then I combine the best generations during editing.
Step 5: Create a New Reference Image for Major Scene Changes
If the next scene changes dramatically, create another still image first.
This was particularly useful when I introduced the female dance partner.
Instead of asking the video generator to magically invent the second character halfway through the animation, I created a new reference image showing both characters together.
Then I animated that image.
This gives the AI a much clearer starting point.
Step 6: Use Different Dance Moves
Don’t make every scene look identical.
Think of each generation as another shot in a music video.
You might structure yours like this:
Solo Dance → Partner Entrance → Side-by-Side Dance → Partner Dance → Spin → Dip/Lift → Final Pose
Short visual changes help keep the video interesting.
Step 7: Protect Character Consistency
This becomes extremely important when you’re creating a fictional character.
During generation, AI can unexpectedly change:
- Facial structure
- Hair or fur
- Eyes
- Clothing
- Accessories
- Body size
- Hands
- Teeth
- Jewelry
That’s why my prompts repeatedly reinforce the important visual characteristics.
For example:
Maintain exactly the same face, facial proportions, fur, muzzle, ears, sunglasses, outfit, jewelry, pendant, and body proportions throughout the entire video.
Even then, always inspect your generations.
If something looks obviously wrong, regenerate the scene rather than allowing one bad shot to ruin an otherwise convincing AI video.
Step 8: Add Your Music and Reactions
The animation is only part of the finished result.
Music dramatically changes how an AI dance video feels.
Match your music to the visual style.
You can also add:
crowd reactions, applause, cheering, ambient party sounds, transitions, beat cuts, and sound effects.
The goal is to make several separately generated clips feel like they belong to one continuous performance.
Step 9: Finish With a CTA
Don’t let the video simply stop when the dance finishes.
Use the final few seconds to encourage interaction.
For this video, the CTA was essentially:
“Gusto mo rin bang sumayaw using AI? Type DANCE in the comments!”
That turns passive entertainment into an opportunity for comments and engagement.
PixVerse vs TalkingPhotos AI vs VideoExpress AI
Here’s the easiest way to decide which method to try.
| Tool | Best For | Difficulty | Creative Control |
|---|---|---|---|
| PixVerse | Fast template-based dance videos | Beginner | Moderate |
| TalkingPhotos AI | Human characters and avatar/action content | Beginner–Intermediate | Moderate |
| VideoExpress AI | Custom scenes, characters and storytelling | Intermediate | High |
There isn’t necessarily one tool that is best for every project.
For a quick social-media experiment, I’d start with PixVerse.
For character-based content where talking and other actions are important, I’d explore TalkingPhotos AI.
And when I want to create a more customized sequence with greater control over the story, camera and character, my preferred workflow is VideoExpress AI.
You can even combine multiple tools in one project.
My Simple AI Dance Formula
If you remember only one thing from this tutorial, remember this workflow:
IMAGE → HOOK → SHORT ANIMATION → NEW POSE → ANIMATE AGAIN → EDIT → MUSIC → CTA
Don’t expect AI to direct the entire video for you.
You are still the director.
AI generates the shots.
You decide which shots tell the story.
That’s one of the biggest differences between randomly generating AI videos and intentionally creating content people may actually want to watch.
What Else Can You Create With This Workflow?
Once you understand the process, you don’t have to stop at dance videos.
The same image-to-video workflow can be adapted for:
- AI influencers
- Comedy skits
- Virtual brand mascots
- Music videos
- Product advertisements
- Affiliate marketing videos
- AI spokesperson videos
- Short stories
- Character-based YouTube Shorts
- TikTok and Facebook Reels
A single character image can potentially become the starting point for dozens of different pieces of content.
The creativity comes from what you make the character do next.
Final Thoughts
AI dance videos are fun, but they’re also a simple way to understand a much bigger concept: AI image-to-video storytelling.
If you just want to experiment, start with a template using PixVerse.
If you want to explore realistic avatar actions, try TalkingPhotos AI.
And if you want to build more customized multi-scene videos like the Kuya Kaching example, take a look at VideoExpress AI.
Most importantly, experiment.
Your first generation probably won’t be perfect. Mine aren’t either.
Sometimes AI changes a face. Sometimes a hand looks strange. Sometimes a dance move doesn’t work.
Regenerate the bad shot, keep the good one, and build your final video scene by scene.
That’s the workflow.
Create. Animate. Edit. Repeat. 🎬
Affiliate Disclosure
Some links in this article are affiliate links. If you purchase through one of these links, I may earn a commission at no additional cost to you. I only recommend tools that I believe may be useful for the workflow described in this tutorial.


